
Kurt Shaw of the Tribune-Review did a piece on the upcoming Paper or Plastic show and a photo of my piece is featured!
I'm going to Pittsburgh for the opening, and I'll be sure to take lots of pictures and post my thoughts on the show. After that, there will be pictures of my new jewelry - I promise! No more photos of my new tools and equipment (although that is very exciting too!) - we'll get back to the good stuff.
Wednesday, November 11, 2009
Wednesday, October 28, 2009
Official "Paper or Plastic" Invite


There's not much that is sweeter than being in a show with one of your old professors.
Friday, October 16, 2009
Some Updates
This is a bit belated, but the Daily Art Muse did a little plug of my work back in August. Thanks DAM!
Daily Art Muse - Bugged: Emi Savacool
I also got a little plug on Carrotbox, a website dedicated to non-metal jewelry. Thanks!
Carrotbox - 9/9/2009
Also, my piece, "Emergence", will be featured in the Paper or Plastic? show at Luke and Eloy Gallery in Pittsburgh, PA. The opening is November 14th, so if you're in the area, please stop by!
Paper or Plastic - Luke and Eloy Gallery

Thursday, September 24, 2009
It's been awhile!

I haven't posted in some time, mostly because I've been busy with real life. This is kind of a cheap update but trust me when I say the wait is worth it - I am holding off on some sweet announcements. Hopefully I can reveal them soon!
Yesterday I received my new vibratory tumbler - used for polishing metal - and it is HUGE! Much larger than I expected - but it was the same price as one of the tiny rotary tumblers, so how could I say no? Too bad I'm not sharing a studio...
Speaking of studio, I now have a heavy-duty dehumidifier for space, since it is incredibly damp down there. That means there are TWO dehumidifiers working 24/7 to get that place dry. Because of which, I can FINALLY paint it this weekend, barring any sudden torrential downpours. Fingers crossed!
To tide you over, here's a sneak peek at some materials I'm playing around with...

Monday, August 17, 2009
A quick update


Just wanted to share some photos of the bench setup. I'm still waiting on a few items (i.e. my KILN!!) but I got my torch setup finished, a pickle pot, bench pin, and some ghetto ventilation. I can't wait to get working again!
Thursday, July 2, 2009
A Journey in Making, Part Three
Sorry for the delay in updating with this third installment - I've been busy with real-life issues. I hope you haven't been biting your nails for this one!


We left off in the last part with the shaped copper wings waiting to be enameled. As you can see, we've jumped a bit in time - I don't have pictures between that one and this. In this picture, I have all of the pieces assembled (but not glued) - the carved boxwood body, the enameled wings, and the two sets of pierced silver components that sandwich the enameled pieces. I had decided to carve the wood a little more to get a better shape, hence the un-dyed portion.
The part we are missing is the making of the silver wings. Each piece started out as part of one big sheet of silver, which was cut out with a tiny saw, filed, and shaped with hammers. The smaller silver pieces that make up the top layer have silver pegs on the bottom that poke through holes in both sets of lower wings and peg them into the wood body.
 Now that the beetle was pretty much taken care of, I needed to make the rest of the necklace. If I just strung it on a plain chain, it would look unbalanced, especially in regards to color. These spiculum pieces, made of copper and enamel, were made to go on either side of the bug. The bottom copper shape is what it looks like before it is formed with hammers and a sinusoidal stake.
A lot of my designing is done on the fly. Pretty much 90% of the time I have no idea what the piece is going to look like once I'm finished. Here, I tested out a few different layouts for the chain - this one used tiny commercial chain to connect to the beetle, and the large links were oriented upside-down.
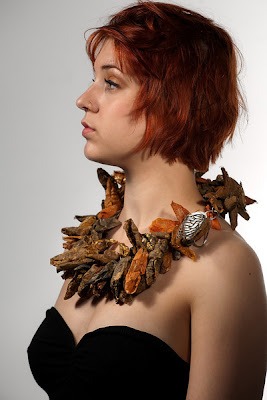
 My baby is all grown up! All components of the beetle are finished/oxidized, the body dyed and sealed, and everything glued together and drying. After this, I hammered the links of the chain and oxidized them before assembling. The sad part about my photos is that you can't see the clasp on this piece, which I really like - it's a toggle clasp made up of a large silver ring and an enameled spiculum. Oh well, so there you go - a semi-complete look into the journey of making one of my pieces! Thanks for indulging me!
 (photo: "Khepera". carved boxwood, sterling silver, enamel on copper. copyright emi savacool, 2009. model credit: kaitlin kerr. photo credit: ken yanoviak.)
Wednesday, June 17, 2009
A Journey in Making, Part Two
* This is part two of a three-part story - for part one, scroll down to the last entry! *
 This shows the central body piece being fitted to the other two. This one was the most challenging to carve because it had to hug the other body piece exactly. The wood pieces were pegged together with rods of sterling silver, and the fit had to be snug
so that the silver would not show.
 After adding an additional wood piece to articulate where the wings attach and pegging everything together, the piece was ready to sand and dye! Our shop tech let me borrow a leather dye that he described as "blacker than black". Yummy~!
After I painted the dye on, I burnished the surface of the wood with a brass brush to work the color in. I did this about 3 times. Later, I sprayed the whole thing with a clear glossy sealant to make the surface more "beetle-y".
 Time for the fun part - COLOR! I tend to do a LOT of samples, especially when I'm enameling, because I'm reeeeally picky about the final product. These are a few of my color samples for the outer wings of the beetle. Since I was not making a total copy of any particular beetle species, I needed to come up with a color combination that was alluring as jewelry but also looked convincing on an insect.
 I experimented with many transparent enamels to come up with the right color and pattern. These were my final two samples. I decided to go with the left one - the more orangey-red didn't have enough contrast with the greens I chose.
In total, I layered 5 different enamel colors to get the right colors. The reactions between the different layers ended up being important, too - the speckling effect was due to one of the bottom layers coming up through to the top.
 Here you can see the wood carving of the body along with the final wing samples and the shaped copper pieces for the actual wings, pre-enamel.
to be continued in Part Three...
Wednesday, June 10, 2009
A Journey in Making, Part One
 (photo: "Khepera". carved boxwood, sterling silver, enamel on copper. copyright emi savacool, 2009. model credit: kaitlin kerr. photo credit: ken yanoviak.)
I've encountered many people who are totally floored when I tell them the price of a piece. Most people are not accustomed to paying much for jewelry - and when H&M sells necklaces for less than 10 dollars, why would you want to pay any more?
I always try to explain to them that the price reflects the amount of hours that go into a particular piece of jewelry. In addition to the artist's unique concept, which is valuable in and of itself, there is a HUGE amount of skilled labor in Crafts. In fact, when you break it down, many times the artist is actually selling their piece at a loss!
To help explain why it takes so much time to make a piece, I've decided to do a little "show-and-tell". For my last piece, "Khepera", I took many in-progress photographs, which I am happy to share with you now!
 We start with the inspiration. This winter I had ordered two mounted specimens, a cicada and a beetle, in order to help me understand the three-dimensional qualities of these insects. The beetle in particular was stunning and dramatic. Next to the beetle, you can see what I started with - a thick block of boxwood.
 I made a very rough mock-up of the form of the head with plasticine clay, then roughed out the general form in wood with a bandsaw. This picture shows a bit of carving with a flex shaft and serrated burr - my primary carving tool.
 The general form is carved here. In this picture you can see two horns I ended up getting rid of on the top of the head. A lot of design decisions are made right in the middle of making something, and I thought these horns looked dumb, so they got the axe.
 In this photo the head is fully carved and sanded. (I must have figured out the macro function on my camera then too, because the picture gets a lot clearer from here on out!) You can see I used the clay again to estimate the size of the rest of the body. Notice the beautiful and careful modeling of the clay here. (Har har!)
 The body in wood, cut out on the bandsaw. (This is still without the middle section.)
 The body, roughly carved with a flex shaft and burr.
 Precautionary measures - wood carving produces a LOT of sawdust, so it is important to cover yourself from head to toe. I use goggles/glasses, a mask, an apron, and a handkerchief to cover my neck so no dust goes down my shirt.
You can see some of the dust in this shot, and the rest...
 ...is mostly here. Usually it just falls off of my lap when I stand up to take a break.
This is what results.
to be continued in Part Two...
Tuesday, June 2, 2009
My Studio-In-Progress
Mallory wrote in her blog that "New Jersey = Purgatory". I moved back home with my parents this weekend, and I'm fighting against that ennui that comes after finishing a busy semester and trying to keep the momentum up.
 This is where my new studio will be. It doesn't look like much now, but this is after I cleared piles of plumbing debris away, swept up, and scrubbed the walls. Tomorrow I'm going to masonry etch the concrete to get it ready for painting. Once it is painted, I can set up my new bench (!!!) and all of my tools and GET WORKING! My fingers are itching already.

This is my new bench! It's not technically a jeweler's bench - it's a lab table that my dad got from a job he finished in New Brunswick. Still, the whole thing is fire-resistant, it's really sturdy, and it looks really sharp. The only problem I anticipate is not having a bench pan to catch my filings, but I might ghetto-rig something up.
I can't stress enough how hard I am trying to keep working at jewelry. I'm trying to do one studio-related chore a day, and so far I have gotten a lot done. Looking at everyone's blog updates keeps me really motivated - it makes me want to work when I see that other people are working too.
This Friday - Crafts Exhibition at the DCCA! (Congrats to Maricha for having her piece featured on the website!)
 This is where my new studio will be. It doesn't look like much now, but this is after I cleared piles of plumbing debris away, swept up, and scrubbed the walls. Tomorrow I'm going to masonry etch the concrete to get it ready for painting. Once it is painted, I can set up my new bench (!!!) and all of my tools and GET WORKING! My fingers are itching already.
This is my new bench! It's not technically a jeweler's bench - it's a lab table that my dad got from a job he finished in New Brunswick. Still, the whole thing is fire-resistant, it's really sturdy, and it looks really sharp. The only problem I anticipate is not having a bench pan to catch my filings, but I might ghetto-rig something up.
I can't stress enough how hard I am trying to keep working at jewelry. I'm trying to do one studio-related chore a day, and so far I have gotten a lot done. Looking at everyone's blog updates keeps me really motivated - it makes me want to work when I see that other people are working too.
This Friday - Crafts Exhibition at the DCCA! (Congrats to Maricha for having her piece featured on the website!)
Tuesday, May 26, 2009
Cameo
 There was an assignment in Advanced Jewelry where we had to create some sort of cameo. We're accustomed to the image of the Roman-inspired cameo, where layered agate is carved into a profile portrait, usually of a beautiful woman.
This assignment was meant to elaborate on the idea of a cameo. What makes a cameo? What qualities does it have? How does it describe a person differently than an actual portrait? Narrowing this down, we came up with a few criteria: cameos were usually in relief, and they described some attributes about their subject - physically or emotionally - without including a background or context.

This project was difficult for me to start, but the result was my favorite piece - inspired by stories from my beekeeper friend Jacqui (jacquialexander.com) and by the beautiful image above (not by me - but I can't find the artist's name.)

(photo: "Elegy". carved boxwood, sterling silver, nickel silver, onyx, dyes. copyright emi savacool, 2009. photo credit: ken yanoviak.)
Monday, May 25, 2009
back it up, back it up...
I've been trying to post my pieces in order, but I got a bit ahead of myself in excitement. Here's two related pieces that I completed in the fall of 2008. During the summer, I had been picking raspberries in the backyard of my parents' house. In the woods, I came upon the perfect skeleton of a deer lying curled in the leaves. In the hot, quiet afternoon, it looked as if it were sleeping.
I couldn't stop thinking about this skeleton for weeks and weeks. The day I left to go back to Philly, I took a big bucket out into the woods and collected the entire skeleton.
 (photo: "Osis Mantodea". carved boxwood, sterling silver, ruby, stainless steel, bone, pigment. copyright emi savacool, 2008. photo credit: ken yanoviak.)
"Osis Mantodea" was the first piece featuring a bit of this gorgeous skeleton. My teacher had suggested that I try and invent imaginary bug forms instead of using existing ones. This piece was completed for a project where we had to make something in one week. (?!! Why did I decide to do this?!! I'm a lunatic...)
 (photo: "Remnant Curios". carved boxwood, bone, pigment, sterling silver. copyright emi savacool, 2008. photo credit: ken yanoviak.)
I love these little guys. They were originally imagined as pins, and could definitely still be worn, although I think I prefer them as little objects. They are totally weird. One of them is completely carved boxwood, with no bone in it - can you tell which one?
Exciting New Photos!

My photos are done! I'm so excited to share with you my pieces from the Crafts Senior Show, Out of Hand. I'm going to span them out a little so I have space to tell you about each one.
This piece may look a little familiar. It was photographed in progress (only the paper parts) for the Out of Hand gallery book and invitations. This piece was inspired by the life of the cicada, who emerges from the ground after 17 years to mate and die. Their transformations leaves behind piles and piles of shed skins.


(photos: "Emergence". carved boxwood, sterling silver, moonstone, copper plated chain, paper, gold leaf, pigment. copyright emi savacool, 2009. model credit: kaitlin kerr. photo credit: ken yanoviak.)
Renderings to tide you over.


I'm waiting on some images of my work from photographer Ken Yanoviak, but in the meantime, I thought I'd share some jewelry renderings from this semester.
Jewelry renderings are scale designs of jewelry. They can be done in most mediums, but are supposed to be fairly true to what the piece would look like in real life. I prefer to make my renderings in gouache and watercolor on bright paper. I am working on making the earrings on purple paper in real life - I'll keep you posted!
Friday, May 15, 2009
a brief update...
I know it's been awhile since I last updated, but I've been totally swamped with work for the senior show. Now that the show is over, I hope to be making more regular updates. My portfolio website will also be up and running soon.
In the meantime, to tide you over, here are some images from the UARTS Crafts Senior Exhibiton, "Out of Hand".


(me and the family in front of my display)
In the meantime, to tide you over, here are some images from the UARTS Crafts Senior Exhibiton, "Out of Hand".


(me and the family in front of my display)
Subscribe to:
Posts (Atom)