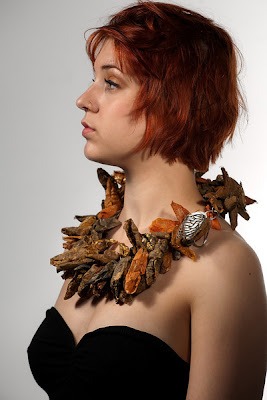
(photo: "Khepera". carved boxwood, sterling silver, enamel on copper. copyright emi savacool, 2009. model credit: kaitlin kerr. photo credit: ken yanoviak.)
I've encountered many people who are totally floored when I tell them the price of a piece. Most people are not accustomed to paying much for jewelry - and when H&M sells necklaces for less than 10 dollars, why would you want to pay any more?
I always try to explain to them that the price reflects the amount of hours that go into a particular piece of jewelry. In addition to the artist's unique concept, which is valuable in and of itself, there is a HUGE amount of skilled labor in Crafts. In fact, when you break it down, many times the artist is actually selling their piece at a loss!
To help explain why it takes so much time to make a piece, I've decided to do a little "show-and-tell". For my last piece, "Khepera", I took many in-progress photographs, which I am happy to share with you now!
 We start with the inspiration. This winter I had ordered two mounted specimens, a cicada and a beetle, in order to help me understand the three-dimensional qualities of these insects. The beetle in particular was stunning and dramatic. Next to the beetle, you can see what I started with - a thick block of boxwood.
 I made a very rough mock-up of the form of the head with plasticine clay, then roughed out the general form in wood with a bandsaw. This picture shows a bit of carving with a flex shaft and serrated burr - my primary carving tool.
 The general form is carved here. In this picture you can see two horns I ended up getting rid of on the top of the head. A lot of design decisions are made right in the middle of making something, and I thought these horns looked dumb, so they got the axe.
 In this photo the head is fully carved and sanded. (I must have figured out the macro function on my camera then too, because the picture gets a lot clearer from here on out!) You can see I used the clay again to estimate the size of the rest of the body. Notice the beautiful and careful modeling of the clay here. (Har har!)
 The body in wood, cut out on the bandsaw. (This is still without the middle section.)
 The body, roughly carved with a flex shaft and burr.
 Precautionary measures - wood carving produces a LOT of sawdust, so it is important to cover yourself from head to toe. I use goggles/glasses, a mask, an apron, and a handkerchief to cover my neck so no dust goes down my shirt.
You can see some of the dust in this shot, and the rest...
 ...is mostly here. Usually it just falls off of my lap when I stand up to take a break.
This is what results.
to be continued in Part Two...